Long, long ago, in a garage far, far away, a gaggle of VW mechanics gathered around a 1700 engine, which Volkswagen had brought out to replace the 1600. We were anxious to tear one down and see how you could improve on perfection. Actually, we were a kind of cheering section, giving the usual hi-fives and 'We're Numba Won!' as the autopsy progressed.
Right off the bat we got a winner when we pulled the valve covers to get at the rocker arms because the rocker-arm shafts were grooved for lubrication channels. That means a mod some of us had been running for nearly ten years had now been blessed with the Holy Crescent Wrench of acceptance in all factory-built VW engines (ie, this was in the early 1970's). Then came a minor scuffle over the thermostat; missing as they usually are on so many Volkswagen engines, with some of our band of experts admitting they'd never even seen one.

In the HVX MODS you need to cut eight rather accurate grooves in the existing rocker-arm shaft and things were heating up between the How-Toz who were automotive machinists with twenty years of grease under their fingernails and the Street People, which included the Shade Tree experts, arguing first, that the 1600 and earlier engines didn't need them because they'd run just fine until now, and the Do-It-Right Group which included some pretty good wrenches who had followed the HVX logic but were arguing how to cut the required groove. Those who were machinists were holding out for a shaped carbide cutting tool, whereas the Lo Buck Warriors with a teenie-weanie 7x10" lathe and a bench-top drill-press were insisting an angle-head grider with a 1/16" blade did the job just fine.

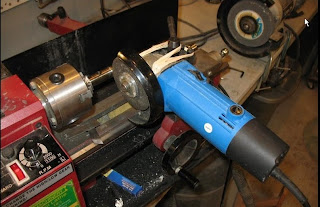
As usual, tasks ultimately descend to the abilities of the craftsman rather than the tools, with several examples of guys who built race-winning engines with a very modest inventory of tools. With jobs such as this the task often breaks down on how to hold the work... or how to hold the tools. In the photos you can see the rocker-arm shaft held in the three-jaw chuck of the lathe whilst the angle-head grinder is attached to the cross-feed by humungous rubber bands. Which is pretty smart. The grinder's speed is marginally controllable through the use of a 15A motor speed controller. This gives the machinist the ability to find a cutting speed that produces a clean, even cut without having the grinder try to climb the bar. The rubber bands provides the necessary amount of flex between the lathe and the grinder as each is brought up to speed, at which point the cross-feed is used to feed the tool -- the 3" dia. carbide disk spinning as fast
 as 18,000 rpm -- into the work, producing a groove of the required shape, depth and width. (Click on the picture). The builder, Mike Sample, has built a Double Eagle and has now turned his obvious talents to making himself an engine. Or rather, engines. Unsatisfied with the first, which I judged to be of about Porsche quality, he has turned his hand to a second which I'm guessing will be equal to something with entwined R's on the cowling.
Here's a shot of Mike's 'dirty' work surface - a section of marble counter-top. Next comes the grooving of the rockers and confirmation of their ability to flow oil through the Ford/Subie type adjusters. These swivel-foot adjusters date from the early 1960's when they were introduced by Ford of Germany. Additional pictures and some early HVX drawings will show how the lubricating oil wends its way from the oil pump, up the push rods, through the rocker arms and out of the adjustable rockers where it pools in the tops of the valve-spring retainers, to be thrown off, carrying with it a considerable quantity of heat whilest at the same time, reducing the wear of the rocker-arm shims. Off-road racers and hot-rodders have been using these mods since the mid-1960's but it came as a considerable surprise to find that many builders of Flying Volkswagens appeared to have never heard of them.
-R.S.Hoover
PS -- Some folks didn't like the look of the pix, worried that abrasives were getting into the lathe's guts & gearing. Personally, I've found that showing people what you set-up REALLY looks like generates more mail, asking if I've cut holes in a quilt and installed it over the tools.
Basic rule with abrasives is to catch them before they can get to surfaces that can be damaged by them. The usual method is to lay-out shop-towels, overlapping, giving each layer a spray of kerosene (then) or WD40 (now) . By the time you get done, the shop has vanished from your How-To pix, leaving you with pix that look like you've set-up atop your bed. While these pix may not display reality, they have the advantage of showing the newbie how the parts are mounted in the tool and what tool(s) you are using.
Nowadays, with the ready availability of tempered aluminum and small lathes that are accurate and affordable, it's as though our shops have shrunk. Covering it up with shop towels gives an even worse impression, in my opinion. - rsh

