As originally designed the Volkswagen’s flywheel was located using four 7mm dowel pins. The pins were quite short, extending barely a quarter of an inch into the crankshaft and even less into the flywheel. When the Porsche 356 was introduced in 1948 it used many Volkswagen components including the engine, although with numerous modifications. One of those mods was to replace the flywheels four 7mm dowel pins with eight pins. When American hot-rodders began massaging the VW engine one of the first things they did was to re-dowel the flywheel following the Porsche pattern but using 11/32" (8.73mm) dowels three-quarters of an inch in length, seating the dowels deeper into the crankshaft and full depth through the flywheel. Volkswagen eventually followed the American’s lead - - as they did with many other hot-rod innovations such as case-savers and the external oil cooler - - but using only four 8mm dowels.
Four 8mm dowels proved sturdy enough even for fully laden Transporters but eight dowels have become standard for all high-rpm engines. One reason for this is that in the Porsche pattern one of the extra dowel pins is offset by 1.25mm, allowing the flywheel to be indexed to the crankshaft in a specific orientation. Since the crankshaft and flywheel are balanced as a unit for high rpm engines, the Porsche pattern ensures the as-balanced orientation will not be disturbed.

Nowadays most VW engines converted for flight draw upon the VW racing community for parts and while 8 dowel pins are not needed in a flying Volkswagen, after-market crankshafts usually comes with the extra dowels already installed. This leaves the homebuilder with two options. They may remove the extra four dowel pins, being sure to pull the set that includes the off-set pin, or they may re-drill the component that must mate to the 8-doweled crank.

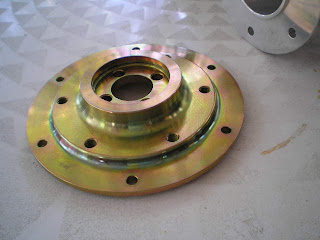
Here's a Great Planes flywheel-end flange about to be drilled to fit on an 8-dowel crankshaft. Steve will sell it to you already drilled for eight. Or sell you a drill-jig (but not like mine) so you can do the job yourself.
Pulling a flywheel dowel is a no-brainer if you’re tooled up for it, which most homebuilders aren’t. The basic tool is a slide-hammer with a set of metric collets - - probably $150 at todays prices (2007). The tricky bit here is that collet sets aren’t created equal. In some, the collar is too large to allow the 8mm collet to get a bite on a VW’s dowel pin. Then too, even with the proper collet some dowels refuse to budge, usually because a bit of swarf was trapped in the bore when the dowel was driven home. And finally, there are homebuilders who simply can’t afford an 8mm collet, let alone a whole set.
A reasonable substitute for an 8mm collet is a cheap pair of vise-grips. Not real American-made Vise-Grips with their hardened jaws but a pair of cheap Chinese copies with jaws that flatten out the first time you use them. Find yourself a set like that and you can make a dandy dowel puller by simply drilling the jaws with a letter-size ‘O’ drill (which is pretty close to 8mm). (Dressing the jaws flat with a file will increase their grip on the dowel.) Add a whiff of valve grinding compound to the jaws and they will grab ahold of the hardened steel dowel even more tightly than a collet.
Heating the crankshaft to about 200 F. is always a help in pulling dowel pins.
Finally, when you get one that is seriously stuck, install a round-nosed punch in a chatter gun or riveting hammer, press it firmly against the bottom of the threaded bore on the pulley-end of the crankshaft and give it a brappp whilst pulling gently on the collet. The dowel will ‘walk’ out of its bore like a magic trick.
The other option - - re-drilling a part to match the 8-dowel crank - - is equally easy. You simply buy a suitable drill-jig from an after-market VW retailer. I took a snap-shot of the one I use, along with an assortment of dowels. It’s more than thirty years old and still works okay. But shop around. In writing this article I checked with half a dozen sources and found the price of a drill jig varied from less than $20 to more than $70.

The hole is always drilled undersize, of course, using a 5/16" drill bit. For a press-fit, once drilled, you use an 8mm reamer to bring it to size. The reamer you use for your valve guides will work but you’ll get a better finish on your guides if you reserve a carefully honed reamer for that task alone. For dowels, a cheap foreign-made reamer will work just fine. But again, shop around. Lotsa guys will charge you fifty bucks for an eight-dollar reamer. If you want a free fit you’d drill it out with a letter-size ‘O’ drill bit and not bother with the reamer. In either case, always chamfer the edges of the finished hole.
-R.S.Hoover

