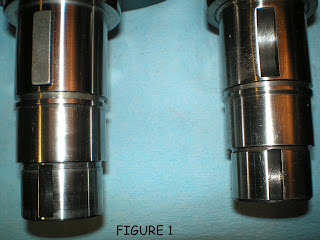
The crankshaft goes down to the magnaflux shop bare. That’s so they can peer down into the Woodruff keyways and the bottom of the groove for the circlip and, most important on a Chinese crankshaft, into the groove between the pulley hub and the #4 main bearing. That’s because on Chinese crankshafts this groove has square corners, whereas it’s a smoothly radiused curve on real crankshafts. The snap-ring groove on Chinese crankshafts also wanders around a bit.
If you look closely (click on the picture), Fig 1 will give you some idea of what I’m talking about. That’s a Chinese stroker on the left (of course :-) and a stock Germany crankshaft on the right. But the scary bit is the square corners in the groove behind the pulley hub (Fig 2). Square corners act as s
 tress concentration points and standard manufacturing practice, esp
 ecially with hardened, high-alloy steels, is to avoid them. Figure 3 is a close-up of the German crank for comparison
- - - - - - - - - - - - -
After the crank comes back from the NDT shop, assuming it’s usable, the next step is to have it balanced. Which isn’t to say it isn't already balanced. But proper balancing calls for the crankshaft to be spun-up with with all of its attachments. That means we have to assemble the crankshaft, except for bearings, from the prop hub right through to the dynamo’s rotor, torque everything to spec and deliver it to the balance shop.
-------------------------------------------
The first step in assembling the crankshaft is to install the large Woodruff key then the cam’s driver-gear, a spacer, the distributor’s bevel gear and the snap-ring that prevents the world from coming to an end.
The steel driver gear and brass bevel gear are a shrink fit to the crankshaft, meaning we have to heat them. The spec calls them to be heated to 80 C. or about 176 F. Everyone gets them hotter of course, assuming that if a little heat is good, a lot of heat is better. It’s not, but there you are.

Figure 4 shows a very plebeian method of properly heating your gears. Put about three inches of water in the big can, the gears in the small can, then spoon in enough lard to cover the gears. (The curiously bent wire is how you retrieve them.) Put the can full of gears into the water and put the big can on a stove and bring the water to a boil. Let it simmer for about twenty minutes then carry the whole shebang over to the bench holding the crankshaft, fish out the cam gear, slide it on (bevel toward the flywheel, please) and seat it with a few carefully aimed blows using a brass drift. Slide on the spacer then fish out the scroll gear and slide it on. Get rid of your tin cans & boiling water and install the snap-ring.
I donno why the thought of using lard makes so many people laugh. If you got something against pigs you can use salad oil. Or motor oil. The idea of the water is that it has a high specific heat – it will keep the parts hot while you carry them back & forth. Plus you can do all your heating with a ‘hobo’ stove and two charcoal briquets... or a camp-fire, if it comes down to it. The key is that you need a pretty good heat sink, because the minute you remove the gears from the heat they start to cool off. The shade-tree types solve the problem by heating the gear to the point where the steel changes color... along with its physical properties.
You don’t have to ruin your cam gear by overheating the poor thing. It slips on just fine if heated to the specified temperature, assuming it’s actually at that temperature when you slide the thing on.
When I start assembling a crankshaft I put the gears atop a big hunk of aluminum (Fig
 5), pop them into a little oven I’ve got out in the shop and set the dial to ‘200' (which is as low as it goes). When I’m ready for the gears I drape a welding glove over them, carry the block over to the bench and install them. The block of aluminum will keep the gears hot for about ten minutes.
No aluminum? Then use steel.
No metal at all? So use a brick, fer crysakes. And if you don’t have a brick, use a pie-pan filled with sand. Or rocks. Or whatever else that can serve as a thermal mass.
And about here you’ll see that lard (or whatever oil you prefer) and a coffee can of boiling water isn’t quite as funny as it seems.
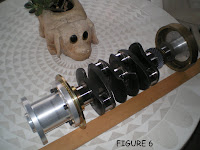
Once you’ve got your gears installed you can assemble whatever else goes on your particular crankshaft. Figures 6 & 7 is the crank for an engine that drives the prop off the flywheel end. The rotor for a permanent-magnet type dynamo is attached to the pulley hub. Everything is indexed; there’s only one way for it all to go together. It will be spun up as an assembly, resulting in a smoother-running, more durable and more efficient engine.


(The spruce lath is to keep it from rolling away. The prop flange and hub are from Great Planes. The cam gear has been treated with a solid-film lubricant.)
-R.S.Hoover
No comments:
Post a Comment